Releasing
Happy new year,
I hope you’ve had a decent break and are motivated to create a great 2010 for yourselves. It’s time to crack on with the beatmatching tutorials so this week we will look at what I call ‘releasing’. To others this is part of the cueing process but none of that is important, what really matters is that you know what it is and how to do it.
What is it?
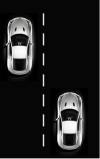
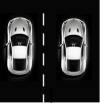
Recall that last time we cued a track by finding the 1st beat and setting a cue point on it. The next skill you’ll want to learn is to play the track so the beat starts at exactly the same time as the beat on the track that’s being played. Think of it like this. Track 1 is a car in the left lane and track 2 is a car in the right lane. When both cars are beatmatched at the same BPM they will be travelling at the same speed. However, this doesn’t necessarily mean the beats are aligned and everything will sound great. Let’s take a look at what’s happening on the road in front of my house:

Both cars are travelling at 20mph and so have the same tempo. However, they aren’t side by side. This would sound like the beats of track 1 playing slightly ahead of the beats of track 2 and you’ll hear a galloping effect.

We want to align the beats and make sure they stay aligned.
The approach
To do this, you need to learn how to release the track on time and align the beats up if the release is slightly out. As always, watch the video to understand what is being said here. The steps we’d take are:
- Start with 2 dance tracks that have beats and are playing at the same tempo. If you have a BPM counter, use it. If not, other options are to play the same track on both decks or if using MP3s, use software to calculate the BPM. We don’t need the tempos matched exactly, just enough so we can go a few bars before things get out of sync.
- Now cue track 1 to the 1st beat and let track 2 play.
- By now you should know how to count beats and bars. When track 2 is about to play the 1st beat of a bar, press play on track 1. If done right, the beats will start in sync. Keep cueing and playing track 1 until you get the hang of this.
Jogwheel correction
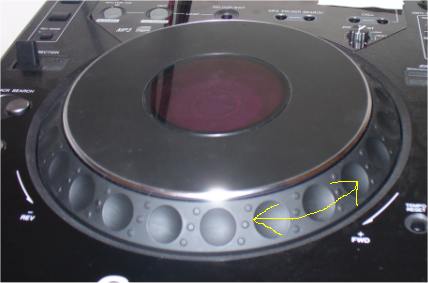
Don’t worry if you don’t release exactly on time. I tend to release a little late most of the time but then I correct myself quickly using the jogwheel. Around the edges of the jogwheel you have a movable part which you can move forwards and backwards.

When you move this forwards (clockwise) it will accelerate the BPM until you let go. The faster you move it, the greater the acceleration and therefore the higher the BPM. In our case we know that the BPM of both tracks are the same so there’s no need to change anything at the tempo control. Going back to the car analogy, we simply want to reduce the gap between the cars until they are level and then let them run at the same speed. We do this by accelerating or decelerating temporarily.
If you released late, you will want to make little nudges forwards. If you released early, you’ll want to make nudges backwards to decelerate the track temporarily and allow the other track to catch up. As you practise this over and over again, you’ll start to get an idea whether you released too early or too late. It can be difficult for a beginner to know this just by hearing the beats. I myself am not always good at this so I tend to make a guess. I’ll nudge the jogwheel forwards and if that makes the beats sound further apart I know I’ve gone in the wrong direction. In the video I’ll purposely release late and early to show you what I mean.
Until next time….
Practice the ‘releasing’ process. Next we will be looking at correcting the BPM when both tracks are running at different tempos.


